This guide is an overhaul of a previous piece, entitled "Encrypting email with Mailvelope: A beginner's guide."
Photo by gajman. CC BY 2.0
Table of Contents
- What is Mailvelope?
- Getting started with Mailvelope
- Generating keys with Mailvelope
- Adding contacts to your keyring
- Sending and receiving encrypted emails with Mailvelope
- Advanced features in Mailvelope
- Mailvelope best practices
What is Mailvelope?
Mailvelope is a tool that works in your web browser to facilitate end-to-end encrypted email. When you send an end-to-end encrypted email, that means that only you and your contact can read your messages, and no one else — not your email provider, your contact’s email provider, or any network snoopers.
Mailvelope makes sending and receiving end-to-end encrypted email on your computer simple: Sign in to your existing email service from your web browser, compose an encrypted message in Mailvelope’s integrated browser experience, and click “Send.”
Like any other tool that encrypts your email content, Mailvelope won’t protect the metadata of your messages from other parties. Some actors may have the ability to see information like when you sent a message, who it was addressed to, the Internet Protocol (IP) address of the devices involved, and more.
If you must use email for private correspondence, however, Mailvelope is an appropriate choice for those who are just getting started with end-to-end encryption in email on their computer. Mailvelope won’t work on mobile browsers, similar to the majority of traditional email encryption tools.
Requirements:
- An up-to-date web browser; Firefox, Chrome, Brave, or Edge
- Mailvelope browser extension from Mailvelope’s homepage
Getting started with Mailvelope
Once you install the Mailvelope browser extension, a Mailvelope icon will appear at the top of your browser, to the right of the address bar. Click on the icon to bring up your Mailvelope control center, where you’ll go through your initial setup.
Before you can start sending encrypted emails to your contacts, you’ll need to configure your Mailvelope with two files that together make a keypair. Your keypair opens up the doors of encrypted email, and consists of a public key your contacts can use to encrypt messages to you, and a private key you use to decrypt messages addressed to you, so you can read them. While many of your friends might hold on to a copy of your public key, your private key is for your eyes only.
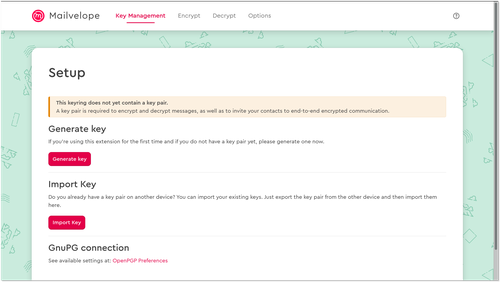
If this is your first time using encrypted email, select the option to “Generate key.” We’ll walk through the full key generation process in the next section.
Note: If you’ve already used email encryption with another tool and want to continue using the same keypair, select the “Import key” option instead of generating a keypair. You’ll then import your old public/private keypair as a file or text block. After importing, consider securely deleting any unneeded copies of your keypair, and making a secure backup to an encrypted storage device.
Generating keys with Mailvelope
Generating a keypair in Mailvelope is simple. It’s only a required step if it’s your first time using encrypted email, or if you’ve tried encrypted email before but want to start fresh with a new keypair.
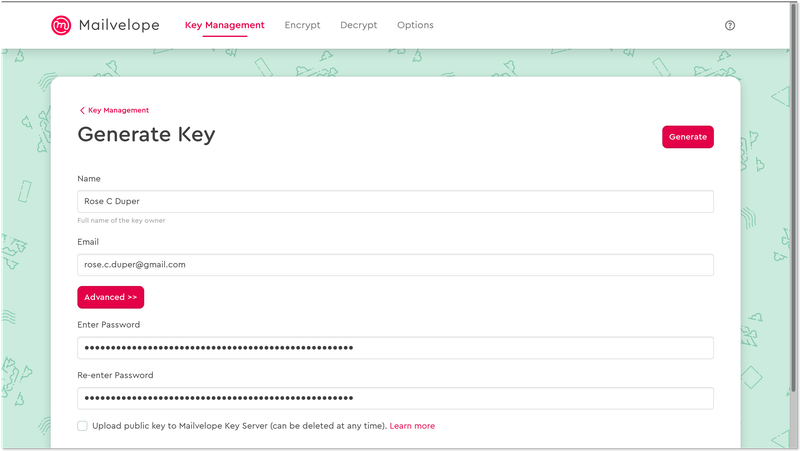
During your initial setup, click the “Generate key” option to configure your new keypair. You can also generate a new keypair at any point by navigating to the “Key management” menu in your Mailvelope control center and clicking “Generate key.”
Name & email
To start, input the “Name” and “Email” you plan to use as your primary contact for email encryption. Later, people you correspond with can use this contact information to look you up on public directories called key servers.
Advanced: Algorithm, key size & key expiration date
Next, the default algorithm and key size entries under “Advanced” are good as-is — RSA encryption at 4096 bits is the strongest option available.
Setting a key expiration date is not required, but does keep you accountable for stricter key maintenance. Chances are this will not affect most people, but it is technically possible for a sophisticated actor to compromise a user’s key. If this is a concern for you, consider setting an expiry date 1-2 years in the future.
Password
Finally, it’s time to choose a password. The passphrase you designate in the “Password” field should be unique, long, and randomly generated. Why? The strength of the encryption protecting your private key is directly related to the strength of the passphrase used to secure it. If an adversary gets a copy of your private key, they may be able to decrypt your messages. If you have a long and random passphrase, however, you can rest easier. A lengthy, unique passphrase likely requires an impractically long time for a hacker to guess.
Uploading your key to Mailvelope’s key server
Be careful with this next part.
Before hitting the Generate button at the bottom of the window, you’ll notice a checkbox giving you the option to upload your public key to Mailvelope's key server.
If you select this option, people can pull your key through Mailvelope and start sending you encrypted emails within moments of generation. This is a bit like putting up a public listing for your key, but you want to be sure this key and the associated email should be public, because the public listing is permanently available to anyone.
If you don’t choose this option, not to worry. You can always push your key to Mailvelope’s key server — or any other key server, for that matter — later.
If you do send upload your key to Mailvelope’s key server, you’ll be sent an email asking you to verify your key. Why? You have to interact with Mailvelope to prove that you indeed own the email account tied to the key that you are trying to send up to its servers.
Adding contacts to your keyring
Under the “Key Management” tab in your Mailvelope control center, you’ll find your keyring. Think of your keyring as your encrypted email contact list. When you import a contact’s public key, it’ll show up in your keyring so that you can easily encrypt messages to them in the future, and update their key information as needed.
When you first configure Mailvelope your keyring will look pretty empty.
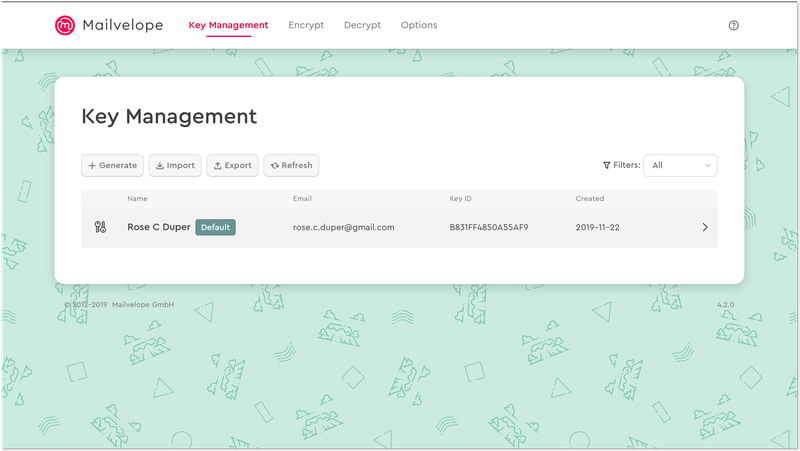
The image of two interlocking keys you see on the far left of your entry points to your public/private keypair. Later on, your contact’s keys will appear with a single key icon next to their public key information.
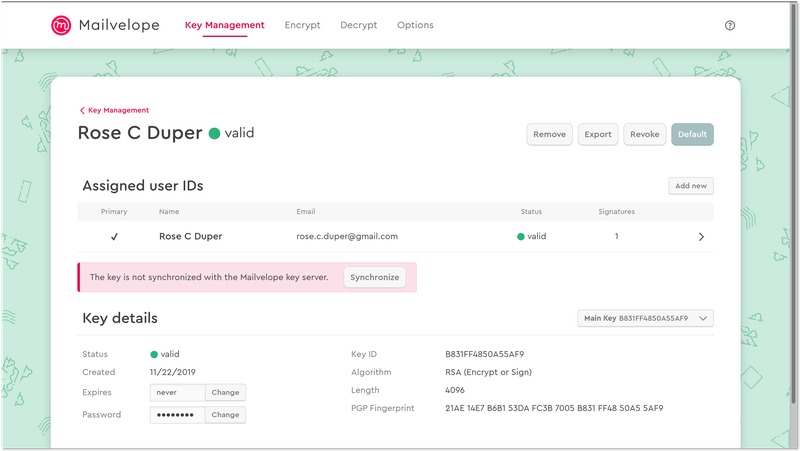
When you click on your key’s entry in your keyring, you’ll see more details about it. Most notably, you’ll find your key’s PGP fingerprint, as well as its key ID.
A PGP fingerprint is a 40-character identifier attributed to a single public key, while a key ID is a shortened version of the fingerprint — in Mailvelope, featuring the final 16 characters of the full fingerprint. Each key has a unique ID and fingerprint, and, in addition to name and email, are used to search on public key directories called key servers.
Now that you’re set up with your own key on Mailvelope, you’ll want to add the public keys of individuals you’d like to communicate with over encrypted email. Note that you can only send encrypted emails to friends who have gone through the steps to set up their own keypair, so your mileage may vary.
Adding contacts on key servers
If your correspondents have already begun sending encrypted emails, chances are they’ve uploaded their public key to a key server. Once you’ve send your public key to a key server, anyone can search the key server for your key, import it to their keyring, and send you encrypted messages.
Let’s try it through Mailvelope’s key server search feature.
From “Key Management,” click the “Import” button and select “Search.” In this example, we’re trying to find a public key so that we can encrypt a message to [email protected]. Before searching, we’ll change the key server to Ubuntu’s key server on the bottom left of the screen.
Click “Search,” and Mailvelope guides you through the rest of the process.
There are dozens of key servers (e.g., pgp.mit.edu, keys.openpgp.org), many of which share data, collectively updating one another with new keys. Not all key servers talk to one another, so you may have to search through a couple different key servers before finding your contact’s public key. While it’s customary to upload a key so others can find you, many people don’t upload to multiple key servers, and your contacts might opt-out altogether.
If you can’t find your contact’s key information on any of the key servers available through Mailvelope’s key search feature, not to worry, there are other methods of getting their information in your keyring. See your options in the next section.
Adding contacts with a public file or text block
In addition to searching key servers, you can add your contact’s public key to your keyring by manually uploading a copy of it. Some contacts will send you their public key as an attached file in an email, while others may post their public key as a text lock on a personal website.
Under “Key Management” and “Import,” you can directly import your contact’s public key. If you have a contact’s public key saved as a file on your computer, select the file on your computer and click “Confirm.” The same goes for public key text blocks you can copy and paste.
Sending and receiving encrypted emails with Mailvelope
Now that you know how to add contacts to your keyring, you’re probably anxious to start sending your contacts encrypted emails. As a reminder, encrypted email only works if your contacts also have a method to encrypt and decrypt messages with their own keys. Your contacts aren’t required to be Mailvelope users, however, as all popular email encryption tools are built on the same encryption standard.
Sending your first encrypted email with Mailvelope is simple.
Open up your email inbox in a browser window on your computer. When you start composing a message, you’ll notice the Mailvelope icon on the top right of the text field. Clicking on it brings up Mailvelope’s message encryption editor.
If you don’t see the Mailvelope icon in your email provider’s message composer, you may need to make a tweak in your settings (see “Custom email integration” in the section below for help).
From Mailvelope’s message editor, select your intended recipient. If your recipient is listed in your Mailvelope keyring with a valid public key, their name will appear green in the “To” field.
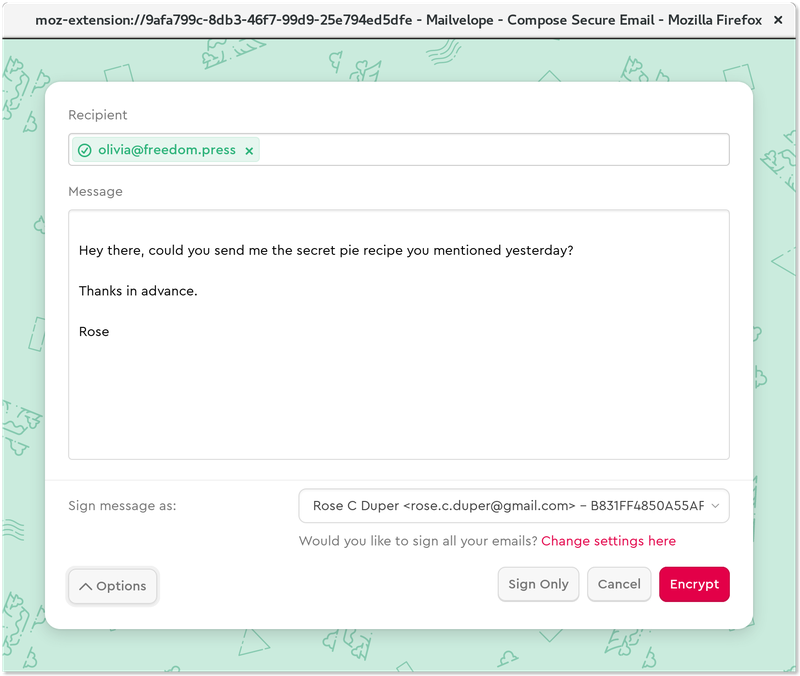
Write a message to your contact, choose whether you want to sign it, and click “Encrypt” when you’re done. Mailvelope will now place your message in your regular email window as an encrypted text block.
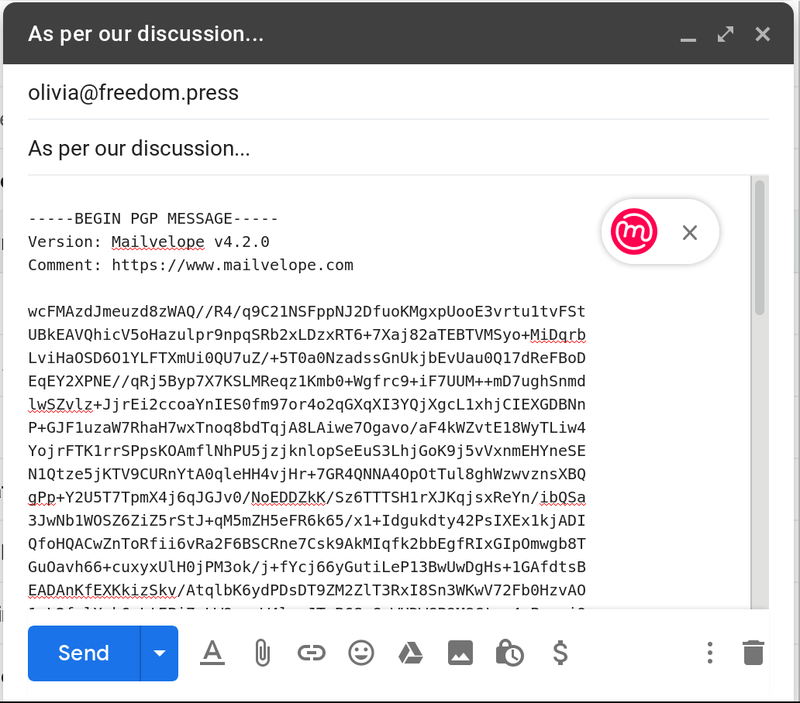
Before you send: Your email subject won’t be encrypted, so double check that it doesn’t reveal any information you’d like to keep private. Other metadata, like your recipient’s email address, won’t be encrypted either. If you want to send an encrypted attachment, you’ll have to do that separately before you attach it. See our next section on advanced features in Mailvelope for guidance.
When everything looks good to go, click “Send.” You’ve sent your first encrypted email. Not so bad, right?
When your contact responds with their own message, it’s time for you to work some Mailvelope magic and decrypt the encrypted text with your private key.
From your inbox window on your computer, open your contact’s message. Your contact’s encrypted message will either show up as a block of text in the message field, or as an attached .asc file containing a text block, like in the example above.
Mailvelope will highlight the encrypted message text with Mailvelope’s icon. Click the highlighted message, and type the encryption password you set when you first generated your keypair. Mailvelope will now display the decrypted message text for you to read and respond to. It’s that easy!
Advanced features in Mailvelope
Once you get more comfortable with Mailvelope's basic features, you might want to start playing with more advanced applications.
Custom email integration
Mailvelope can be configured to work with pretty much any major email provider that lets you access email through your computer’s web browser. If you’re having trouble using Mailvelope with your email provider, it might be because your email is set up with a custom domain that is not authorized by default in Mailvelope.
For example, if your news organization uses a custom email domain through Outlook or Gmail, set up like “[email protected]”, you might have to authorize your domain through Mailvelope before you can begin using it in your inbox.
This may sound confusing, but in most cases you don’t need to be an expert on how your email is set up in order to fix the issue. Mailvelope has a simple way to authorize custom email domains. Just open up your inbox in a browser tab, click the Mailvelope icon to the right of the address bar, and select the option to “Authorize this domain,” and click “Ok” on the auto-generated entry.
If you don’t succeed with this method, you can always manually authorize your custom domain in Mailvelope’s settings.
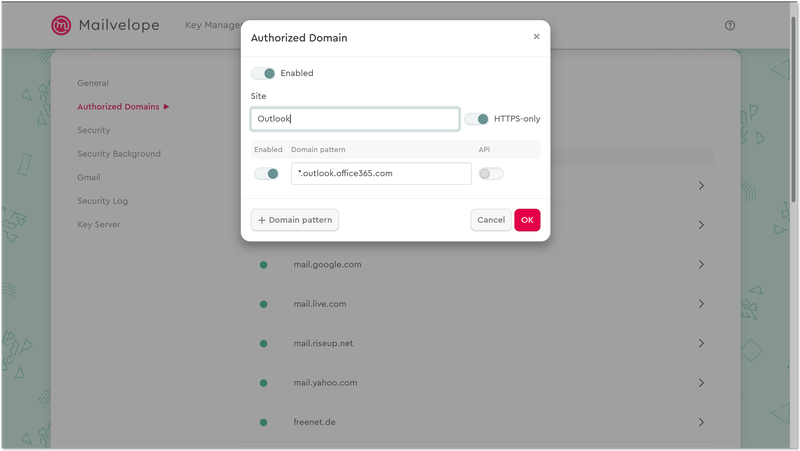
Navigate to your “Settings” in the control console. Under “Options,” you’ll see “Authorized Domains.” This is the section you can use to add your custom email domain.
As an example, if you’re using a custom Outlook domain, add "*.outlook.office365.com" to your list of providers. The next time you refresh the tab on your Outlook web interface, Mailvelope integrations will be enabled.
If you’re stuck, and don’t know how to find the right domain to authorize, contact your email administrator.
Encrypted attachments
This is important: Mailvelope does not automatically encrypt your email attachments. You’ll have to encrypt files using Mailvelope’s separate file encryption feature before attaching them to an email.
Double check you have the public key(s) for your intended recipient(s) before starting.
From the Mailvelope control center to the right-hand side of your browser window, select “File Encryption.”
Fun fact: You can always encrypt files to yourself, to save sensitive information in an encrypted state for safekeeping.
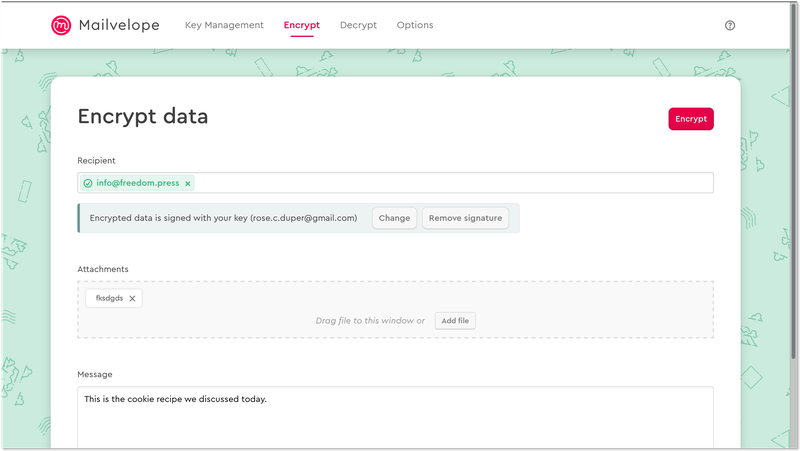
In the screenshot above, we’re encrypting a text file, and an accompanying message, to one of the contacts in our keyring.
Under “Recipient,” select the person, or people, you intend to share the file with.
Next, you have the option to choose whether or not you want to sign the attachment. When you sign data with your key, it is a public attestation that you are who you say you are, and you meant to send what you sent. More simply, signing data is the cryptographic equivalent of notarizing a document.
Finally, you have the option to write an encrypted message.
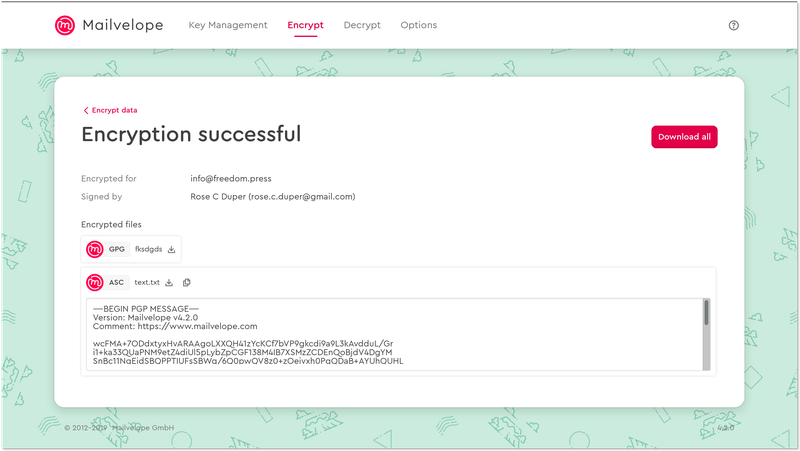
Once the encryption process is complete, you’ll be brought to a screen that gives you an option to download an encrypted copy of the original file and message text.
At this point, you can download the encrypted data to add as an attachment to an email, or to save to an external storage device for safekeeping.
Exporting your public key
Some common reasons you may want to export your public key are:
- Sharing your public key directly with new contacts
- Uploading your public key to a key server
Go to “Key Management” and click into your key to view your key details. Under the “Export” option on the top right side of the screen, select the option labeled “Public.” You can then export your public key as a text block or file, and begin sharing with your contacts or on a public key server.
Your public key is meant to be distributed widely with contacts, as opposed to your private key, which is meant to be kept close and secure.
Take care to confirm you are in fact exporting only your public key before proceeding.
Your public key block will begin with “-----BEGIN PGP PUBLIC KEY BLOCK-----” . The default file name will end with “_pub.asc”.
Exporting your private key
In some cases, you may want to export your private key:
- Distributing a private key for a shared email address to team members
- Migrating a private key from Mailvelope to another GPG/PGP utility (such as GPGTools, Kleopatra, Keybase, or a smartcard)
- Create a backup of you private key to keep for long-term storage
Go to “Key Management” and click into your key to view your key details. Click the “Export” button on the top right of the screen. Selecting “Private” will export just your private key, while the “All” option will export your public and private keys together.
You should always be very careful when making copies of your private key. Make sure it’s a deliberate choice, and that you are exporting it to a location you trust (e.g. an encrypted external storage device, or computer you own). Your private key block will begin with “-----BEGIN PGP PRIVATE KEY BLOCK-----” . The default file name will end with “_priv.asc”.
If you are exporting your private key to keep as a backup in a secure location, export it as an armored (.asc) file directly to encrypted, external storage. Lock it up in a safe location.
You may come across a situation where you’ll have to share a public/private keypair with collaborators, such as a shared inbox receiving messages encrypted to a single public key. This workflow is delicate, and requires some planning to do right.
To reach our trainers about more sophisticated distribution strategies for sensitive key information, send us a contact request.
Mailvelope best practices
Maintaining the security of your encryption keys is no small feat. Take heed of the following considerations surrounding browser security, account security, key servers, and data protection.
Keep your browser trustworthy and up-to-date
Mailvelope is built into your browser environment, which means that you must trust your browser to handle your private key information, as opposed to storing it directly on a device you control and trust. Keep up with vulnerabilities that might compromise your keys by updating your browser as soon as updates are available.
Restrict your Mailvelope activity to a single profile in your browser, dedicated only to encrypting and decrypting email
This can be set up in both Firefox and Chrome.
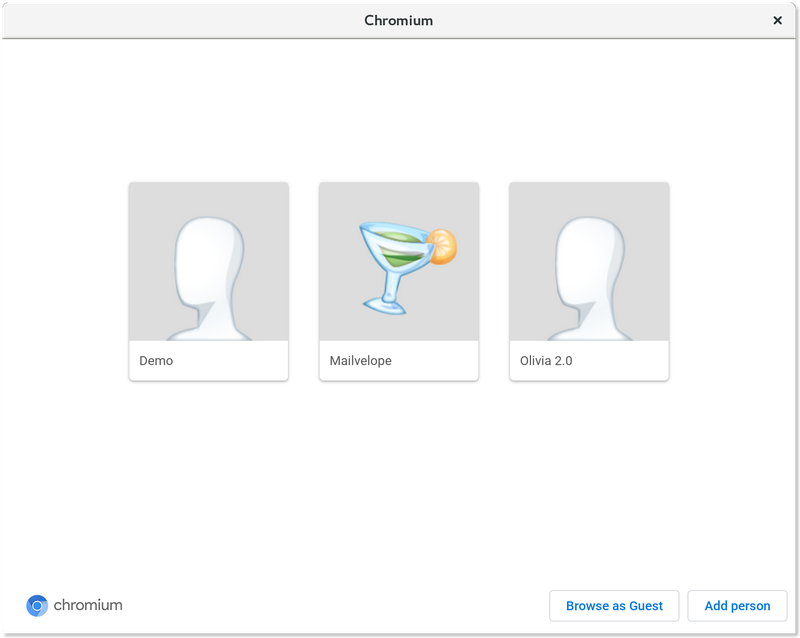
In Chrome, for example, you can easily enforce these settings by using the Profiles feature. As Settings and Extensions Data is specific to the profile, you can set up a new profile in your Chrome settings, outfit them with strong security settings as suggested below, and pivot to that profile whenever you’d like to use Mailvelope.
Same story with managing separate profiles in Firefox, which you can access by typing “about:profiles” into your address bar.
Apply these ideal browser settings
- Declutter your browser extensions. We do recommend the use of a small collection of extensions — a reputable ad blocker, Privacy Badger, and HTTPS Everywhere — to protect you as you surf the web, and defend against maliciously-crafted sites from slurping up your keys. Delete any unnecessary extensions you’ve collected over time.
While optional, these tips will boost your overall privacy and security while you browse:
- In your browser settings, disable Javascript by default (you can give exceptions to your webmail domain, etc.) as it is sometimes an attack vector. If you haven’t already, block Third Party Cookies.
- Regularly clear your browsing history and cookies. Please do note, however, that clearing cookies will sign you out of active sessions on many services.
Hardening your browser settings is not the end-all-be-all for surfing the web securely, but will hit much of the low-hanging fruit concerning browser-based encryption solutions.
Keep your email account secure
You’re going to be using Mailvelope to protect the content of your emails. Do yourself a favor and take this opportunity to lock down your email account itself.
As with all your online accounts, it’s good to use a strong, unique passphrase and to enable two-factor authentication. Using a mobile application like Google Authenticator, FreeOTP, or even a hardware token like a Yubikey, you can generate a one-time code, which is required for login. Even if an attacker has your password, two-factor authentication will help to secure your account, as an attacker likely won’t have this required second piece of information.
You can find detailed email best practices and anti-phishing tips in our phishing prevention guide.
Be wary of key servers
Because they act as public, searchable key registries, key servers are extremely helpful tools to find and verify contacts who also use email encryption. That said, bad actors have been known to exploit their helpful and open design in order to delegitimize another person’s key listing.
People can vandalize keys, or publicly post a fake email or key for someone else’s email address— changes that can stay publicly accessible on key servers forever. As a result, be careful when accepting other people’s keys. Before initiating contact with a source, take public key fingerprint verification to a trusted channel. If possible, ask a person to read their full fingerprint aloud, ideally in person or on a video call, and cross-reference it with the key fingerprint you have for them in your keyring.
You can find the 40-digit key fingerprint of any key on your keyring in “Key Details” by clicking on the key entry.
Endpoint data protection
Make sure you enable full-disk encryption to protect your computer’s hard drive, as any copy of your private key will live within your hard drive as a file. Once enabled, full disk encryption scrambles all the data on your computer as soon as you turn it off, and is a helpful data protection strategy when you are worried your device might be stolen or confiscated.
If you are using backup software that copies files on your hard drive to a third-party service, make sure your backups are encrypted so that a third party can’t access your files — including your PGP private key.
Enable full-disk encryption on macOS with FileVault, Windows with BitLocker or Veracrypt, and Linux by setting up an LVM with LUKS encryption at initial setup.


